PBR Maps vs Base Color on the Same Generated GLB
Compare actual base-color, metallic/roughness and normal maps on two fixed meshes. See two light setups, screenshots and measured pixel changes.
The stone house kept the same 18,459 triangles when we changed its material. Under low grazing light, replacing the metallic and roughness map with scalar values changed at least one 8-bit color channel by eight or more in 14.62% of the foreground pixels. The dog and bench reacted less to the same change. This comparison holds geometry and camera constant, shows the actual embedded maps, and tests how much of the visible result depends on the material rather than the mesh.
Key takeaway
- We started with two real Tripo H3.1 GLBs and made two material variants of each. The binary chunk, mesh definitions and accessors are identical within each sample. Only JSON material settings changed.
- In the stone house at low grazing light, disabling the normal map changed 2.83% of foreground pixels by our threshold. Replacing the metallic/roughness map with scalar settings after that changed 14.62%. These are separate adjacent comparisons under one renderer and light setup.
- Removing the normal map reference eliminated a tangent-space warning in both files. That changes the material path. It leaves the original tangent data as it was.
- The extra images remain embedded in all three versions. Changing their material references is useful for comparison. For delivery savings, create a separate export that removes unused data and verify it again.
What is in the two original GLBs?
The dog and bench came from the Tripo P2 and H3.1 comparison. The stone house is the mesh from the Gaussian splat and GLB comparison. Both are textured H3.1 outputs with the same three material slots. The bench has 18,834 stored triangles and the house has 18,459. They are useful together because one has painted metal and fur and the other has a tile roof, walls and a courtyard. Each asset is compared against itself under two light setups.
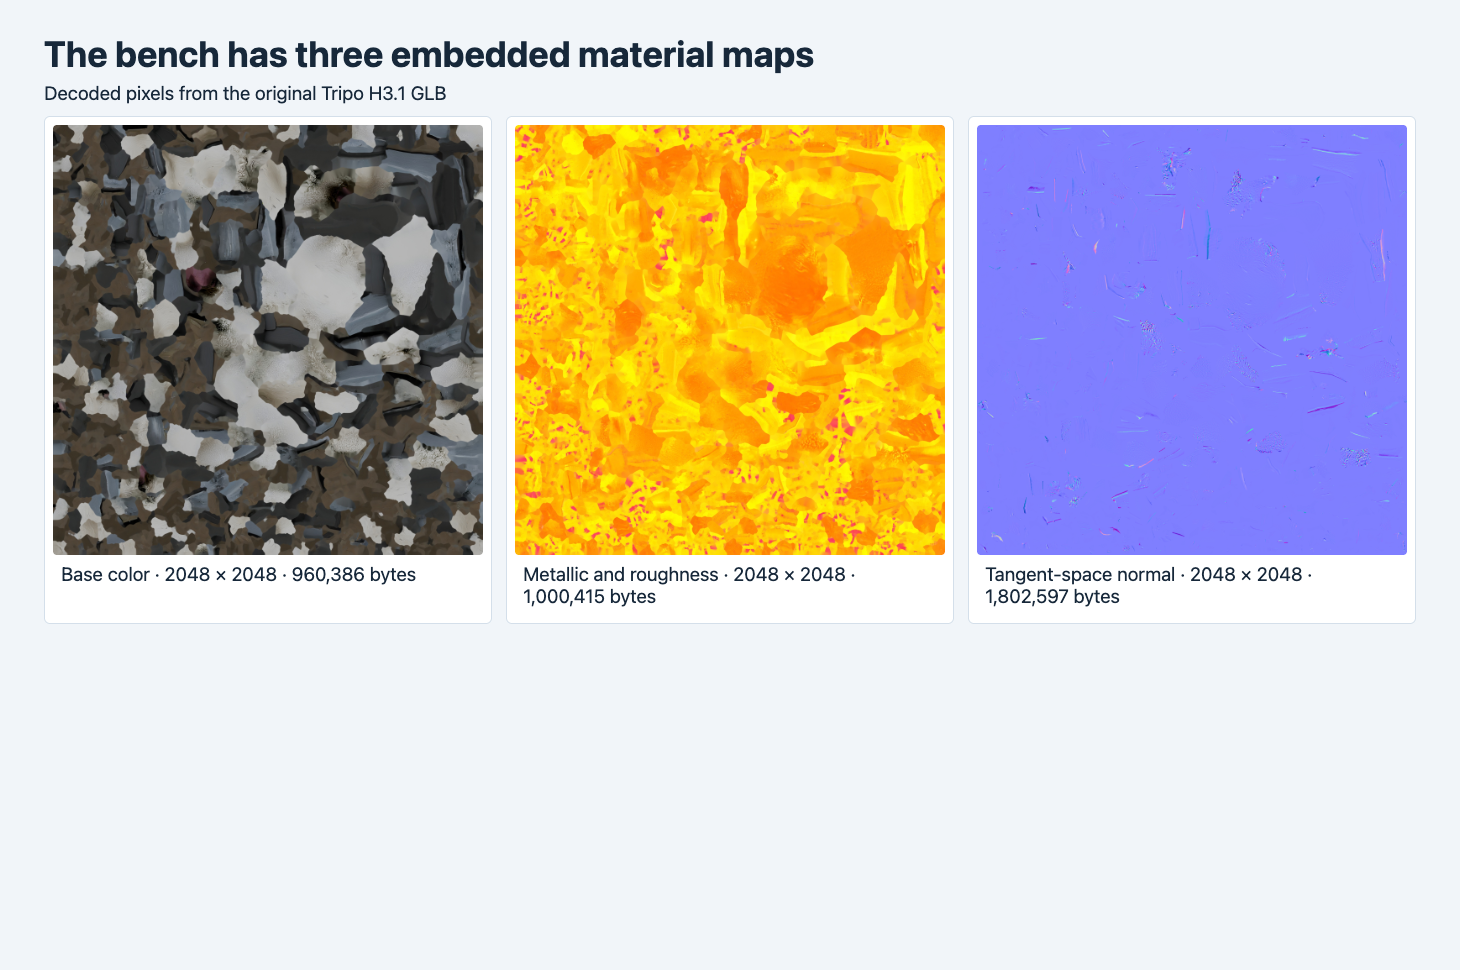
These are decoded pixels from the original bench asset. Byte labels refer to the encoded images inside the GLB. The orange/yellow and purple panels store material parameters.
In a glTF metallic-roughness material, base color supplies the surface color. The metallic/roughness texture uses the green channel for roughness and blue for metallic. A tangent-space normal map changes the shading normal used when the light hits the surface. It can suggest surface relief while leaving positions and indices untouched. Three different maps affect three parts of rendering, so inspect the material slots and lights before drawing conclusions from one screenshot. glTF 2.0 material specification
| Original image slot | Bench bytes | House bytes | Dimensions in both files |
|---|---|---|---|
| Base color | 960,386 | 1,006,130 | 2048 × 2048 |
| Metallic/roughness | 1,000,415 | 496,168 | 2048 × 2048 |
| Normal | 1,802,597 | 2,177,805 | 2048 × 2048 |
| Total encoded images | 3,763,398 | 3,680,103 | Three images per file |
The normal image is the largest embedded image in both originals. That makes it a candidate for careful evaluation when you need to reduce delivered bytes. The relative size comes from these particular encodings and contents. The house has a larger normal image and a smaller metallic/roughness image than the bench despite identical dimensions. Check measured bytes along with the dimensions.
Build three material variants on the same mesh
We compared the original, the original material with its normal map disabled, and a base-color-only texture setup. The third uses the same base-color image and sets metallic to 0 and roughness to 0.75. It is still shaded with a metallic-roughness material. “Base color” here means one texture reference with two scalar settings. It is different from an unlit render, where the response to scene light would change too.
In each copy we kept the whole binary chunk, including mesh buffers and every encoded image. We verified byte equality of that chunk and compared the mesh and accessor JSON against the original. This controls for position, UV and triangle changes. The two comparisons tell us what happens when the normal map is disabled and what happens when the metallic/roughness map is replaced with fixed settings after that. The second operation combines disabling a map with choosing its replacement values, so the outcome belongs to that specific choice.
| Material version | Bench GLB bytes | House GLB bytes | Validator errors / warnings per file |
|---|---|---|---|
| Original three maps | 4,447,736 | 4,312,248 | 0 / 1 |
| Normal disabled | 4,447,696 | 4,312,208 | 0 / 0 |
| Base color plus scalars | 4,447,656 | 4,312,168 | 0 / 0 |
The 40- and 80-byte differences come from the edited material JSON and its padding in these specific files. All encoded image bytes remain in the package. If you want to save bytes, remove unused images in a separate export and measure again. The GLB size budget test shows how to measure other kinds of optimization separately.
Compare each material under both lights
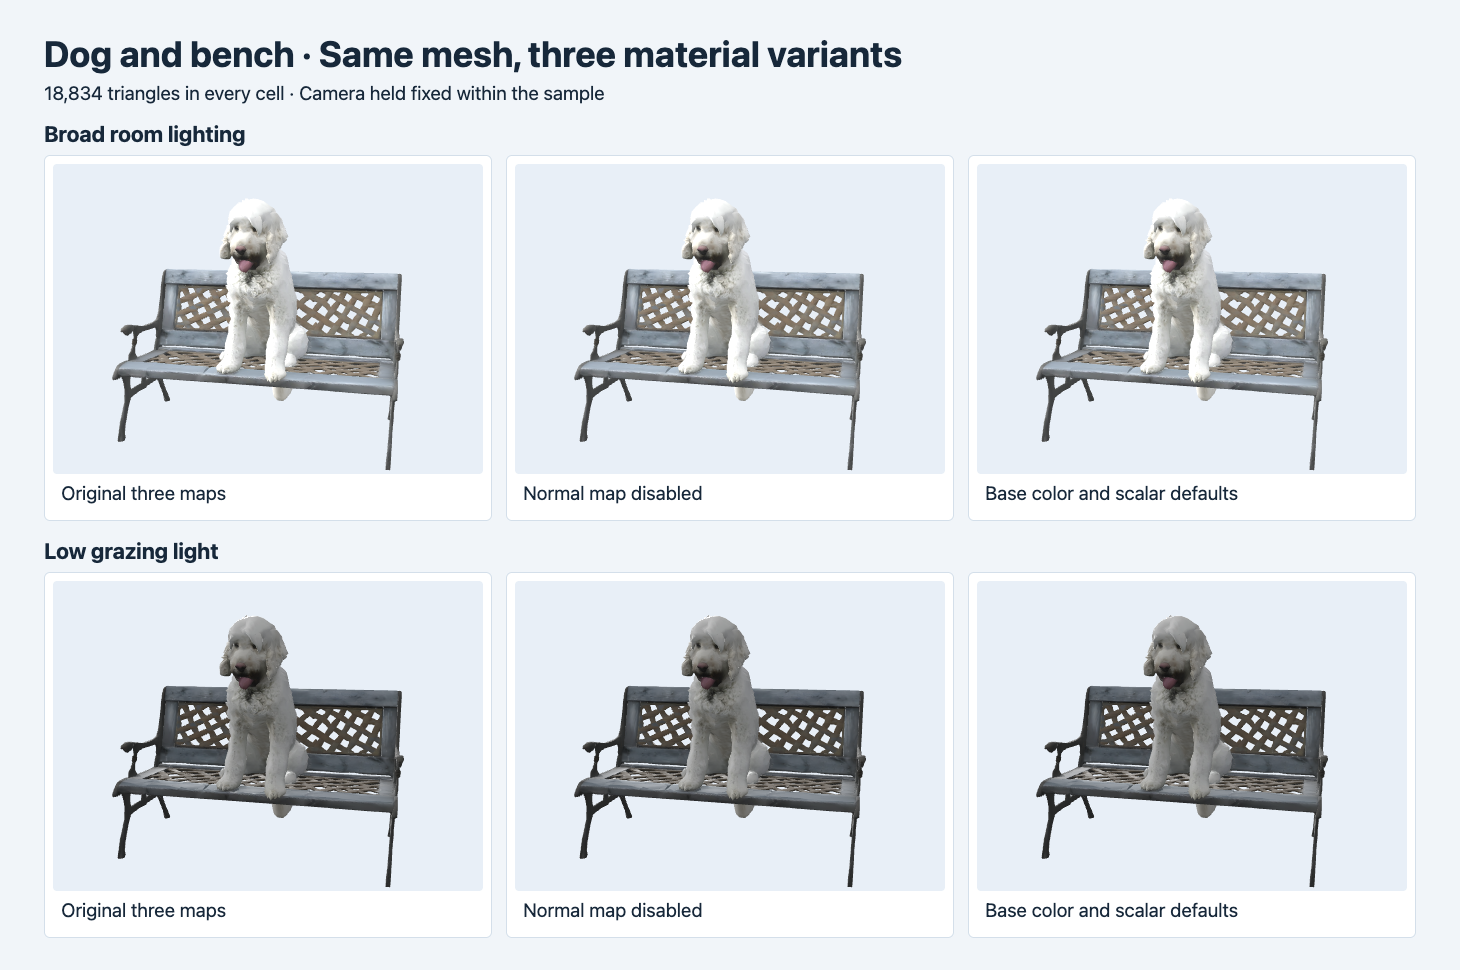
Columns show the original three maps, normal disabled, and base color with scalar metallic and roughness. Within each row the camera, renderer and lighting stay fixed.
On the bench, the lattice, paws and leg shapes remain in the same positions across each row. The differences are concentrated in small areas of fur and reflected light on the seat and rails. The broad room setup shows more pixels crossing our threshold when the normal map is disabled. The low grazing setup shows more pixels crossing it when the metallic/roughness map is replaced. This example gives you a reason to check both a broad light and the light that the product actually uses.
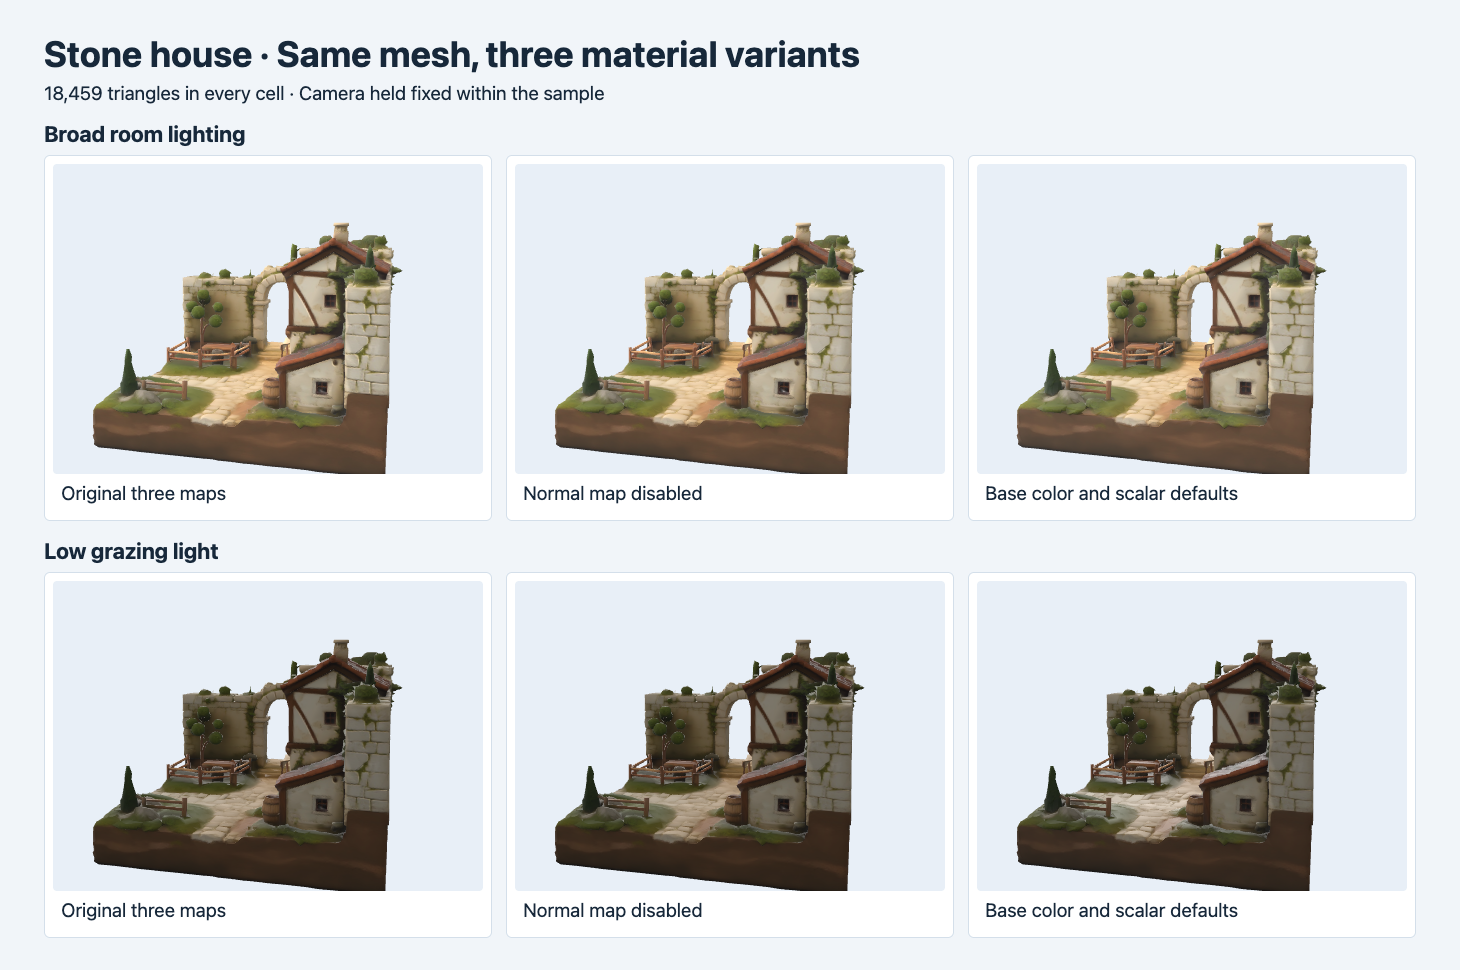
In the darker row, inspect the roof and the stone path as you move from the middle column to the right. The mesh does not change.
The stone house shows a stronger shift when metallic and roughness are replaced. The lighter path, roof highlights and sections of the walls differ under the grazing light. The courtyard opening and roof geometry remain unchanged. A model that looks nearly the same in one still can respond differently when the environment moves or the user rotates it. Check the resulting material in your shipping lighting instead of tuning it against a single default scene.
Measure pixel changes within the controlled setup
We read RGB values from the 430 × 310 rendered canvases. A pixel counts as foreground if it differs from the background in either image of the comparison. We then count how many foreground pixels changed by at least eight levels on any one RGB channel. This threshold is a descriptive measure of the renders. It does not assign a preference or measure physical accuracy. Camera, mesh and light stay fixed within every pair.
| Sample and light | Foreground pixels | Normal disabled vs original | Scalars vs normal disabled |
|---|---|---|---|
| Bench, broad | 33,804 | 3.06% | 1.32% |
| Bench, grazing | 33,804 | 1.67% | 3.73% |
| House, broad | 49,931 | 5.22% | 14.00% |
| House, grazing | 49,931 | 2.83% | 14.62% |
The threshold statistic can give a different ordering from an average absolute difference. Many small changes and a few large changes can look similar in an average. The screenshots show where the changes appear. Different scalar values, lighting, renderer or image resolution would produce different percentages. Treat these values as measurements of these two assets and the settings described.
Put the result to work
Both originals reported one MESH_PRIMITIVE_GENERATED_TANGENT_SPACE warning and zero errors. The variants without the normal reference reported zero warnings. The original render demonstrates what our Three.js setup can show with runtime-generated tangent space. If you need normal maps in the final file, check your target engine or export explicit tangents using a suitable tool. If the visual difference is acceptable with the map disabled, document that choice and validate the exact file you plan to ship. GLB validation and visual review · Khronos glTF Validator
Use a single GLB from Tripo H3.1 image-to-3D to repeat the comparison. Open its material JSON or inspector, identify the actual texture slots, and create independent variants from the same mesh. Render each in one broad-light setup and one light that makes surface changes visible in your app. If you are picking a generation route, inspect the exact returned file as well as the requested material option.
For a complete API handoff from a white mesh, see the Hunyuan geometry and Hi3D Texture workflow with two settled calls and a controlled packed-map comparison.
FAQ
Does PBR require all three maps?
A glTF material can use a base-color texture and scalar metallic and roughness values. The full set of texture slots gives more spatial control. Check which channels the file actually references and how the target renderer interprets them.
Does a normal map change the silhouette?
A normal map changes shading normals in this material. The geometry buffers stayed the same in the test. Check the silhouette and any actual openings with a wireframe or geometry viewer.
How do I find the actual storage savings?
Export a copy with unused references and payloads removed, then compare the file bytes. Validate and render that copy. The variants shown here intentionally preserve the binary payload so the material comparison stays controlled.
Found this useful? Share it