How to Prepare Photos for Tripo H3.1: Framing and Background Tested
Test clean, small, tightly framed and patterned inputs for Tripo H3.1. Compare the actual front and side silhouettes and unwanted geometry.
Tripo H3.1 reconstructed the same case eight times. In the two clean baseline runs, the front silhouette matched the reference at 98.49% and 98.21%. With the same subject pixels and bounds placed over a patterned background, those scores fell to 59.12% and 54.89%. Both patterned-background outputs also showed slab-like geometry beside the case. A tighter clean crop helped the left profile in both seeds, though the front and rear measures did not all improve. This is a guide to what to check in a photo before generating a 3D preview.
Key takeaway
- Start with one clear object and remove unrelated framing elements or background blocks. The controlled background change in this test left the object pixels alone, yet both outputs included conspicuous extra geometry.
- Make the product large enough to see relevant details while keeping the entire silhouette in frame. The largest clean subject here used 92.2% of the width and gave the strongest left silhouette for both seeds.
- Review the thumbnail framing and the generated side before accepting. The six clean inputs gave front overlap above 97.6%, but all six left-side scores stayed below 59%.
- Track completed requests separately from visual rejections. All eight accepted jobs completed, and both background runs would still fail a product-only visual check.
Make only one change at a time
We reused a 768 × 768 orthographic rendering of the authored equipment case from our Tripo multi-view comparison. The case has an open handle, front controls, feet and offset side protrusions. Starting from a synthetic image let us hold its perspective, lighting, subject pose and pixel content constant while changing the framing or surroundings. We measured the bbox of pixels different from the plane background.
The clean baseline occupies 74.3% of the image width and 59.8% of its height. The smaller version resizes the subject to 43.1% of frame width and 34.6% of height, then centers it on the same background. The tighter variant fits the full silhouette in 92.2% of width and 74.1% of height. The fourth variant uses the baseline object’s original position and size while adding colored rectangles and a stripe pattern to the background. We verified pixel equality inside the baseline object mask. The two resized versions also change pixel sampling and center the crop, so this is a comparison of framing presets.
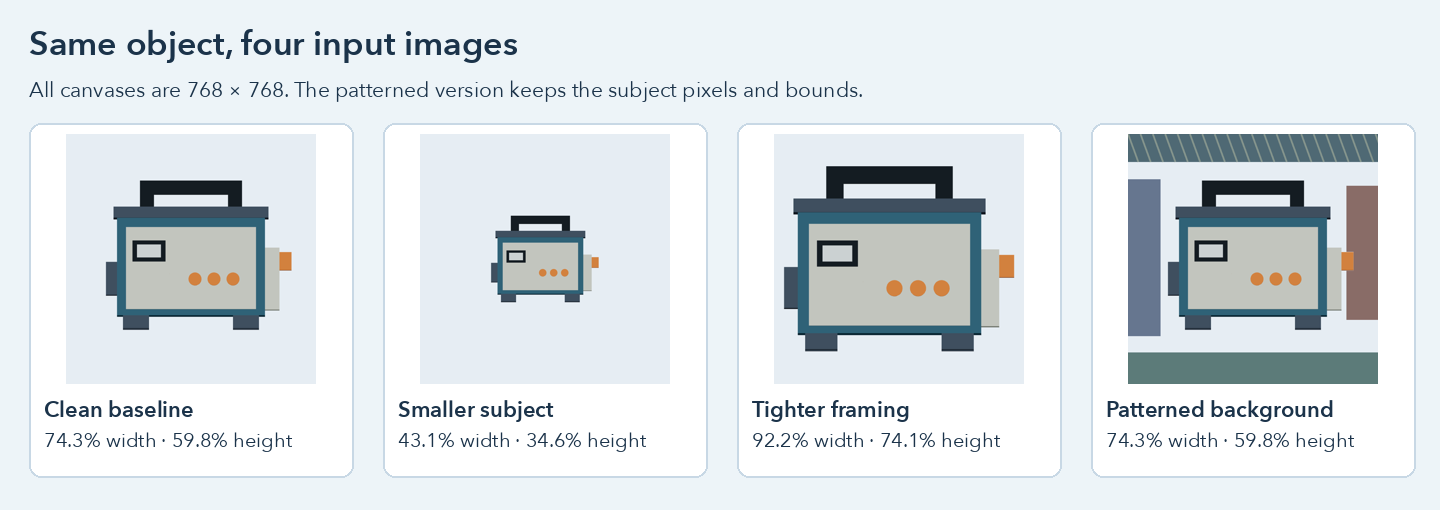
The canvas stays 768 × 768. The background variant leaves all subject pixels and the bounding box of the original intact.
We submitted the four PNGs to Tripo H3.1 Image to 3D with seeds 42 and 73, November 14, 2026 UTC. We used standard geometry, a face target of 100,000, and disabled texture, PBR and quad output. All four variants used the same request settings other than their image and seed. This is the single-image route. We used the source mesh and alternate views only for measurement and inspection.
Each completed job settled at $0.24, for $1.92 total. The eight GLBs ranged from 85,004 to 91,792 triangles and from 2,504,592 to 2,693,280 bytes. None had embedded images, and all passed glTF validation with zero errors and warnings. Format success covered all eight output containers. Our visual check asked whether a discrete product could be placed in a viewer without obvious extra scene geometry.
Keep the background out of the mesh
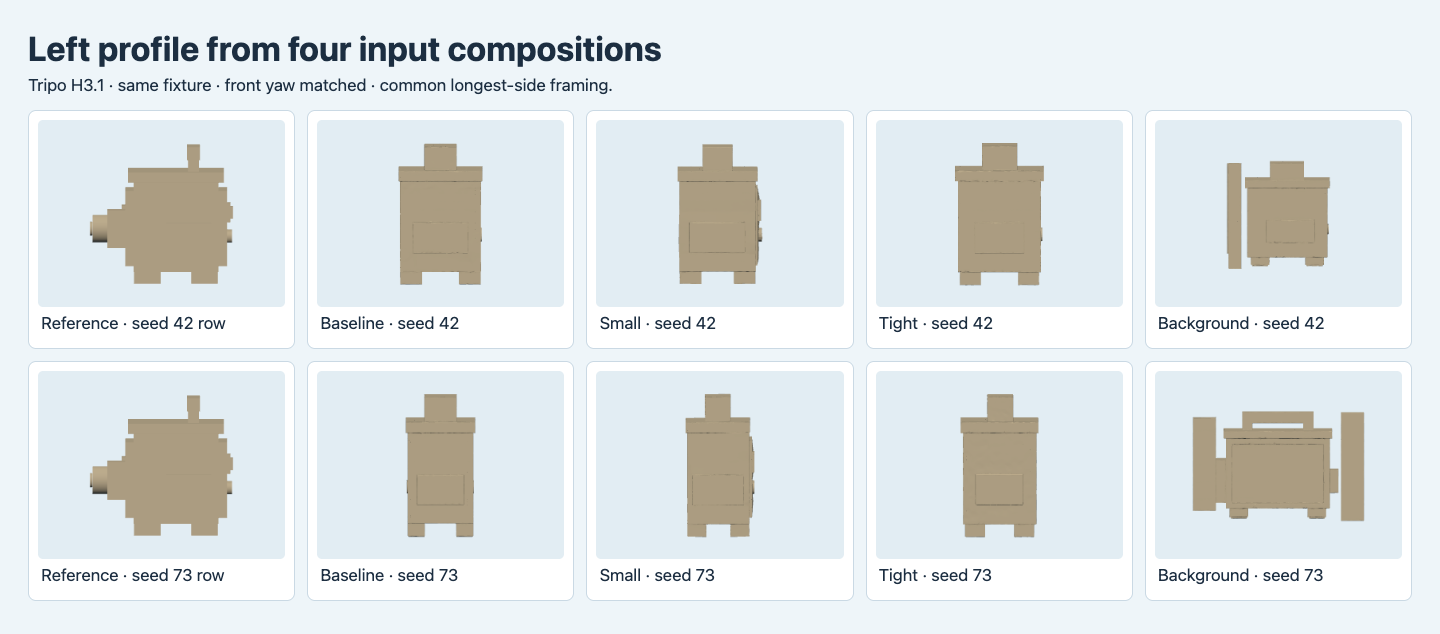
Left-side diagnostic renders at the same normalized display size. The two patterned-input files have extra slab-like pieces, visible even with the materials replaced.
The large blocks outside the subject were meant to act as background. A changed frame boundary can still become part of the model’s geometry. In the Patterned column, seed 42 shows a vertical slab beside the case in the left view. Seed 73 shows larger slab-like elements and a very different profile. Both cleared generation and file validation, but both would fail our product-only visual check because unrelated geometry remains visible. The image pattern in this test is one intentionally artificial arrangement. It cannot establish how often the route treats every kind of clutter as geometry.
The associated front silhouettes dropped 39.38 and 43.32 percentage points from their clean baselines. The yaw chosen from the front also changed for one patterned run. Seed 42 selected 270° under our convention, the same as the clean files. Seed 73 selected 0°. That means one of the largest differences is a finished model requiring more than an easy crop fix at the viewer level. Keeping the model at its default orientation would also hide the relationship to the authored front. Compare the aligned evidence and the default camera state for different questions.
If a source photo has a busy context, prepare a copy with one object separated and compare it to the original. Avoid removing a genuinely attached feature such as a handle or cable as part of cleanup. Inspect the crop at 100% before uploading it. Tripo’s own image preparation guide discusses tools for separating subjects and preparing multiple views.
Compare framing by the surfaces that matter
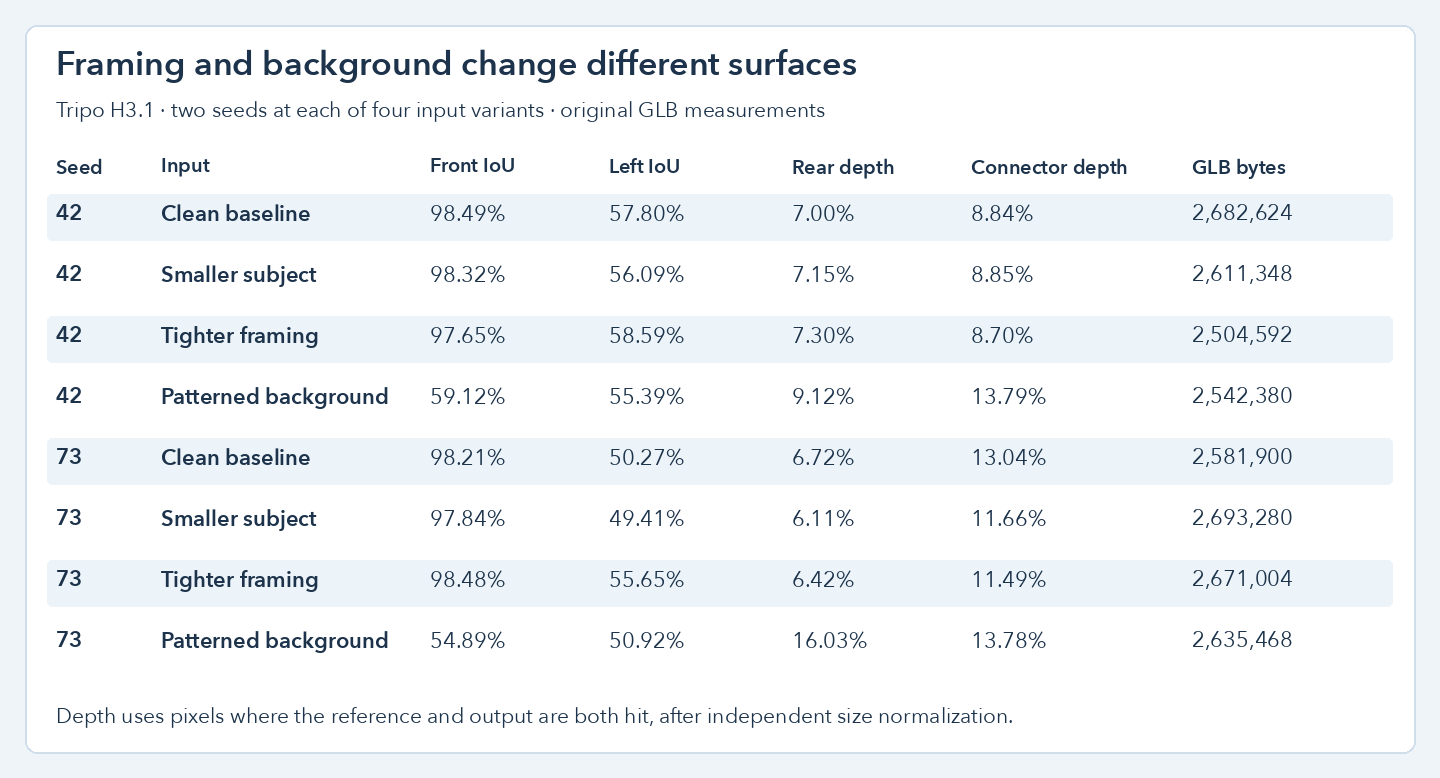
Overlap is a comparison of ray-hit outlines. Depth uses shared rays and is expressed as a percentage of the normalized longest side.
| Seed | Framing | Front overlap | Left overlap | Whole rear depth |
|---|---|---|---|---|
| 42 | Clean baseline | 98.49% | 57.80% | 7.00% |
| 42 | Smaller subject | 98.32% | 56.09% | 7.15% |
| 42 | Tighter framing | 97.65% | 58.59% | 7.30% |
| 42 | Patterned background | 59.12% | 55.39% | 9.12% |
| 73 | Clean baseline | 98.21% | 50.27% | 6.72% |
| 73 | Smaller subject | 97.84% | 49.41% | 6.11% |
| 73 | Tighter framing | 98.48% | 55.65% | 6.42% |
| 73 | Patterned background | 54.89% | 50.92% | 16.03% |
The clean smaller framing lost a little left overlap in both seeds. Tight framing increased the left score by 0.79 and 5.38 points compared with baseline. The front score for seed 42 decreased by 0.85 points as the subject grew. Seed 73 improved by 0.27 points. Use a reasonable clean starting frame and compare subject occupancy only where the output’s profile matters. This test does not identify a universal fill target. In a tighter shot, leave room for any protrusion and check that the top of the handle stays in frame.
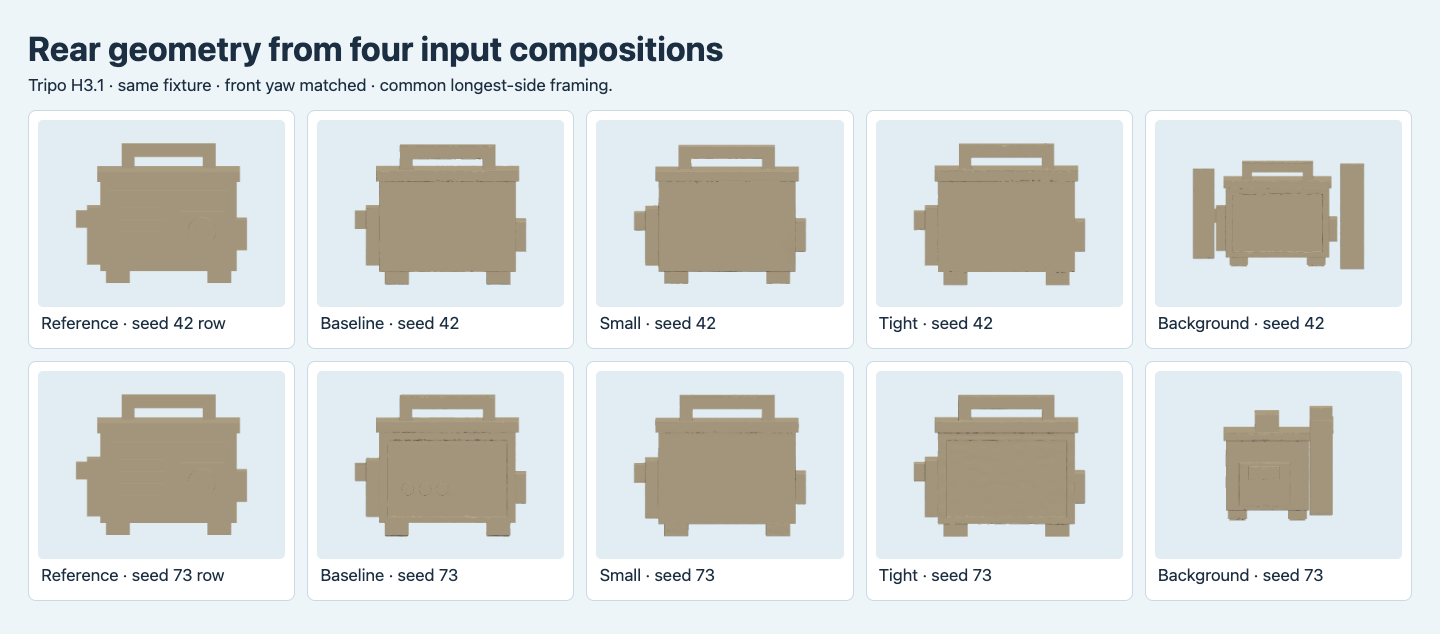
The rear geometry is inferred from one front image. The pattern creates visible extra structure. The cleaner inputs still vary in the geometry of the original rear panel.
All six clean fronts exceeded 97.6% overlap. Nevertheless, the left contours remained under 59%. The reference’s large protrusion sits to the left in the profile image, while the clean outputs look thinner or smoother in the corresponding region. The rear can look tidy while lacking the authored vent and connector arrangement. If a part of your product is hidden in the picture, a larger version of that same picture cannot reveal it. Add the actual side or back to a route that supports it, and then verify the extra view.
Use separate gates for outline and depth
In Blender 4.5.9, we centered each file independently and divided positions by its longest bounding-box side. We cast a 128 × 128 orthographic grid from six directions. Yaw candidates were 0°, 90°, 180° and 270°. The front-only scoring rule combines silhouette intersection-over-union and mean depth difference. Back and profile scores are read after fixing that yaw. Very different geometry can score differently after this fit, even when it has recognizable surfaces.
Depth describes the difference along each successful ray. We average over positions where both reference and output have a first hit. The patterned background at seed 42 had 710 common rays in the connector rectangle, compared with 725 in the other seven runs. Compare the coverage alongside mean depth when some rays no longer hit. The numbers express normalized shape differences. They make no claim about physical size, optical lens corrections, production approval or the general incidence of background artifacts. This is one rendered object, with two seeds per framing preset and no real photo capture.
Frequently asked questions
Should the entire subject fit in the frame?
For this product preview, yes. Preserve the ends, handle opening and any small protrusions that define the silhouette. The tight version here had margin and retained the whole object.
Can focusing on a crop repair geometry on the back?
A crop can keep the important front subject clear. The rear is still inferred in the single-image route. The Tripo H3.1 multi-view test shows separate rear and right inputs on the same case.
What do I verify after the API says completed?
Check that the file downloads and loads, then turn the case around. Reject obvious extras and inspect your mandatory features in each relevant view. Our eight jobs completed and two still showed the patterned background as extra geometry.
Found this useful? Share it